Create RabbitMQ Certificates
Here are guidelines that will help when creating certificates for RabbitMQ.
-
Go to http://indy.fulgan.com/SSL/ and download the latest OpenSSL zip.
-
Unzip the folder and place it in a location of your choice.
 Steps 3 and 4 are not necessary. These steps are only applicable for mapping the openssl.cnf file to a single location
via an environment variable.
Steps 3 and 4 are not necessary. These steps are only applicable for mapping the openssl.cnf file to a single location
via an environment variable.
-
Access the system environment variables and modify the "Path" system variable by adding the location where the OpenSSL folder is located.
-
Open System Properties and click Environment Variables
-
Double click the Path system variable
-
Click New and add the location
-
-
Access the system environment variables and add a new variable that points to the location of the openssl.cnf file.
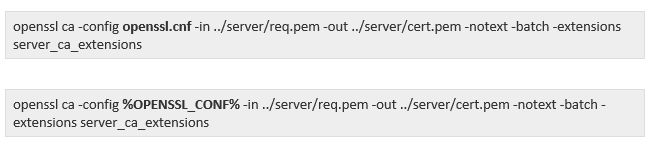
When running the commands specified in the RabbitMQ documentation, replace openssl.cnf with the name of the environment variable
(%variable%) that points to the openssl.cnf file.
Example: Environment Variable - OPENSSL_CONF
-
View the RabbitMQ TLS Support Documentation for instructions to generate the CA, Certificates, and Keys: https://www.rabbitmq.com/ssl.html
-
Navigate to the following heading: Manually Generating a CA, Certificates and Private Keys and follow those instructions.
The command chmod 700 private is not necessary and can be disregarded. The command touch index.txt creates an empty text file
of that name. The equivalent command for Windows prompt is type null > index.txt.
Create folders of names certs and private in the testca directory. This is not specified when following the online documentation.
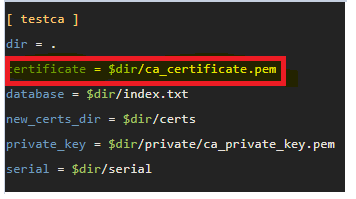
When copying the contents of the OpenSSL configuration to the openssl.cnf file, the testca certificate variable will have to be modified from
$dir/ca_certificate.pem to $dir/ca_certificate_bundle.pem.
There seems to be an inconsistency in the RabbitMQ SSL documentation when generating the key and certificates for the test Certificate Authority. Below are the commands that should be run when generating the key and certificates for the test Certificate Authority.
openssl req -x509 -config openssl.cnf -newkey rsa:2048 -days 365 -out ca_certificate_bundle.pem -outform PEM -subj /CN=MyTestCA/ -nodes
openssl x509 -in ca_certificate_bundle.pem -out ca_certificate_bundle.cer -outform DER
Notice that in the first command the ca_certificate_bundle.pem is specified, but in the OpenSSL configuration $dir/ca_certificate.pem is specified. This is the inconsistency, thus the reason for the modification to the OpenSSL configuration.
In the instructions you will notice the following character at the end of some commands, "\". An initial thought was it part of the command; it is not. It signifies a
continuation; so when actually typing these commands you can disregard the backslash at the end.
Below are the commands that are being referred to (without the backslash):
 When creating the certificate signing request for the server and client, I had initially set the subject name (CN) to be the same for both. This caused the following error: TXT_DB error number
2 failed to update database. To prevent this error from happening, do not set the same subject names for the server and client.
When specifying the Certificate Subject Names for the server and client the dollar sign ($) is not necessary. /O=server/ and /O=client/ are
certificate attributes that set the organization attribute of the server or client certificate. These attributes are optional. Below is an example of how the certificate would be specified
without those certificate attributes.
When creating the certificate signing request for the server and client, I had initially set the subject name (CN) to be the same for both. This caused the following error: TXT_DB error number
2 failed to update database. To prevent this error from happening, do not set the same subject names for the server and client.
When specifying the Certificate Subject Names for the server and client the dollar sign ($) is not necessary. /O=server/ and /O=client/ are
certificate attributes that set the organization attribute of the server or client certificate. These attributes are optional. Below is an example of how the certificate would be specified
without those certificate attributes.
 Ensure that the Client Certificate Subject Name (CN) is the name of the computer that is running the broker; otherwise, the certificate will not validate.
-
Navigate to the rabbitmq.conf file which is located in the following directory: C:\Users\{your username}\AppData\Roaming\RabbitMQ. Note: That file may have to be created.
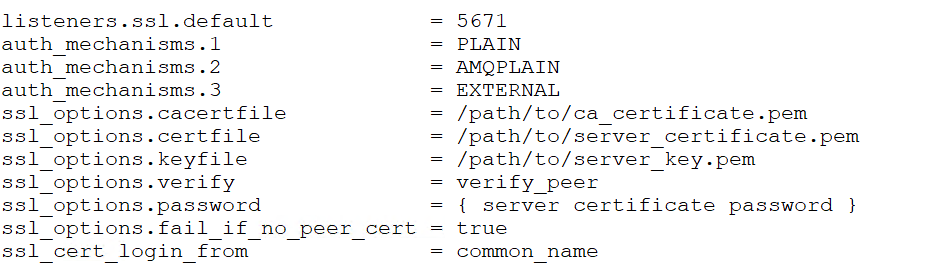
 This is in the documentation under the following heading: Enabling TLS Support in RabbitMQ. This will save from having to type it. Ensure to add the SSL option for password where
server certificate password is specified without the braces and change the value of fail_if_no_peer_cert to true.
This is in the documentation under the following heading: Enabling TLS Support in RabbitMQ. This will save from having to type it. Ensure to add the SSL option for password where
server certificate password is specified without the braces and change the value of fail_if_no_peer_cert to true.
Additionally, replace cacertfile (i.e. /path/to/ca_certificate.pem) with the file location of the CA's (certificate authority's) cacert.pem file; replace certfile (i.e. /path/to/server_certificate.pem) with the file location of the server's cert.pem file; replace keyfile (i.e. /path/to/server_key.pem) with the file location of the server's key.pem file.
-
Once you modify the file, save it and restart the RabbitMQ service.
-
In order to enable external authentication , open the RabbitMQ Command Prompt and type the following command:rabbitmq-plugins enable rabbitmq_auth_mechanism_ssl.
Below is an example of the configuration in rabbitmq.conf when using external authentication:
-
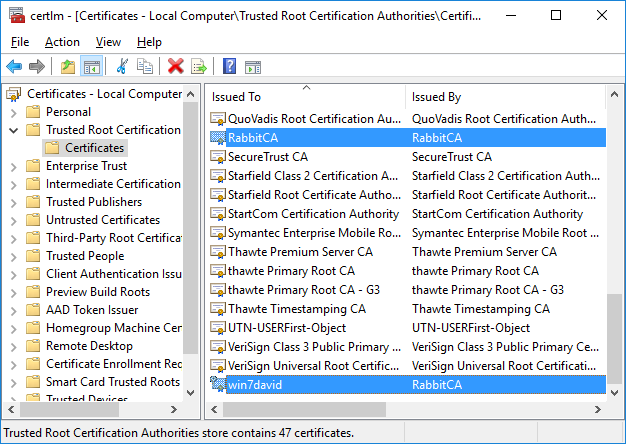
Afterwards, install the CA (Certificate Authority) and client certificate to the computer certificate store in the Trusted Root Certificate Authorities folder. The CA has a .cer extension and the client certificate has is .p12 extension. Just double click on each file to install the certificate to the appropriate store and folder.